Friday, July 5, 2013

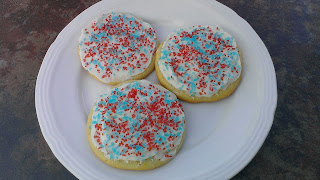
Soft Sugar Cookies

Happy 4th of July!  This is a day late but I'm sure everyone is enjoying celebrating all weekend long with picnics and pool parties.

Did I say I was taking a break from baked goods?  Ha, what a big fat LIE!  I really did try but I just can't keep myself away from baking.  I'm headed to a picnic tomorrow and needed something to bring along.  The 4th of July makes me think about a flag cake my mom and I used to make together when I was little.  It was a simple white cake baked in a 9 x 13 pan and then we decorated it with blueberries, strawberries and cool whip to make it look like an American flag.  It was fun and turned out cute but it needed to be refrigerated and also needed to be sliced.  I believe picnics require foods that can sit out all day and withstand the heat, bite sized desserts people can grab and walk back to their lounge chair and of course with small desserts so you can try more than one!!

I decided to bake cookies and I flipped through my recipe book and landed on Soft Sugar Cookies ... everyone likes them, I can decorate them red-white-and-blue, they can sit out at a picnic and they're easy to transport.  Decision made.  Oh, but the taste brought back so many memories.  I thought a recent cookie, the salted double chocolate peanut butter, were my absolute favorite until I made this oldie but goodie.  This was my favorite cookie for sooo many years and I think in my heart it still remains the favorite.  This is the cookie recipe my mom made when I was growing up...its the recipe I watched her make, eventually helped her make and then made on my own.

Oh soft sugar cookie, I love you.
You make me feel good when I am blue.
You are such a tasty little treat.
No other cookie can compete.

Heres' the recipe!  It makes 24 cookies but can be easily doubled to make 48.

1 cup sugar
1 egg
6 tablespoons margarine, softened
1/2 cup milk
1/2 teaspoon vanilla
1/2 teaspoon baking soda
1/2 teaspoon baking powder
2 cups flour
colored sugar or sprinkles
1 tub of vanilla frosting


Mix all the dry ingredients in a bowl and set aside.  In another bowl cream sugar, eggs, margarine and vanilla.  Slowly add the dry ingredients and milk while stirring.  Refrigerate for 1-2 hours.

Heat oven to 350'.  Line baking sheet with parchment paper and use a medium scoop or tablespoon to drop spoonfuls of cookies about 2 inches apart on the baking sheet.  Bake cookies for 12 minutes and let cool on the baking sheet for 5 minutes then move them to cooling racks to cool completely. Frost cookies with vanilla frosting and decorate with sprinkles.

You can also top the cookies with colored sugars or sprinkles BEFORE baking them and leave off the frosting.  They're good both ways but I like the look of the frosted cookies better.


Tuesday, June 25, 2013

Kath's Homemade BBQ Sauce


I know what you're thinking ... where's the yummy baked goods??  Ha, I'm wondering that too!!!  Well, it was requested by my husband and also my growing gut that I take a break from baking for the summer.  :-(   It didn't stop me from making an amazing Peanut Butter Chocolate Cheesecake this past weekend for a dinner party (having company over is a baking loophole!) but all the little baking (the cookies, brownies, muffins, etc) needs to be put on the back burner for a bit.

Kath's BBQ Sauce is a recipe I thought you might enjoy for all the grilling you're probably doing this time of year.  This is super simple and tastes great on grilled chicken.  I also use it as a sauce when I make BBQ Chicken Pizza*.  A friend of mine recently asked me to share this recipe and I never, ever measured any of the ingredients before ... I always just eye-balled it so that's why some of the measurements are goofy (plus tablespoons).  Makes about 1 1/2 cups of BBQ sauce in less than 15 minutes.  You can certainly make this your own recipe by adding more or less of any of the ingredients so if you like a sweeter sauce add more sugar, a tangier sauce add more mustard and so on.  Enjoy!!!

In a small sauce pan on medium heat add the following ingredients, stir and bring to a boil then simmer for 5-6 minutes.  Place in a container and keep refrigerated until ready to use.

1 cup + 2 tablespoons ketchup
3 tablespoons yellow mustard
1/2 cup + 1 tablespoon brown sugar
1 teaspoon Worcestershire sauce
1/4 teaspoon salt
1/4 teaspoon pepper
1/2 teaspoon garlic powder


*BBQ Chicken Pizza
1 pizza crust
1/4 cup BBQ sauce
1/2 red bell pepper, chopped
1/2 cup chopped onion
1 grilled chicken breast, chopped
1/2 cup shredded cheddar cheese
1/2 cup shredded mozzarella cheese

Heat oven to 400'.  Saute the peppers & onions in a small amount of olive oil until softened.  Spread BBQ sauce on the pizza crust and top with peppers, onions, chicken and cheese.  Bake for about 15 minutes until cheese is bubbly.


Thursday, June 13, 2013

Granola Bars

YES, you can make your own homemade granola bars!  Its easier than you think and the flavor is well worth your effort.  I saw a recipe for these back in the winter time in the Food and Wine magazine and I decided to give it a try.  I tweaked their recipe a bit and can now call it my own.  These disappear quickly in our house. During ski season my husband was leaving with handfuls of these bars to take for a snack and now its golf season and the same thing is happening.  Plus I think they make a great breakfast and my daughter likes them for a snack sometimes.  Hope you enjoy them as much as my family has!

1 cup peanuts, crushed
1/2 cup almonds, crushed or slivered
2 cups old fashioned oats
2/3 cup sunflower seeds
1 cup brown sugar
3/4 cup honey
6 tablespoons butter or margarine
3/4 teaspoons salt
2 teaspoons vanilla extract
3 cups rice krispies
1 cup dried cranberries

The nuts, seeds and dried fruit can be substituted with YOUR FAVORITES.  The combination above just happens to be the one I like best.  I have tried it with raisins and pecans before as well.  Just keep the measurements the same.

1.  Preheat the oven to 350' and line a baking sheet with parchment paper.  Spread the nuts, oats and seeds on the sheet and bake for exactly 8 minutes.  Transfer this mixture to a large bowl.  Don't skip this baking step because this short roasting time is what gives the granola bars such a great flavor!

2.  In a saucepan, bring the sugar, honey, butter and salt to a boil over medium/high heat.  Simmer until the sugar is dissolved and a light brown caramel forms.  Remove from heat and stir in the vanilla.

3.  Pour the caramel over the nut & oat mixture.  Stir in the rice krispies and cranberries until evenly coated.

4.  Take the same piece of parchment paper you used earlier and line a 9 x 13 baking pan.  Scrape the granola mixture into the pan and cover with a second sheet of parchment paper or wax paper and press it down to compress it.  Let stand until firm, about 2 hours.

5.  Discard the top sheet of parchment/wax paper.  Lift the entire block of granola out of the pan and place on a cutting board.  Cut into 24 bars.

6.  Wrap each bar individually with plastic wrap and store in an airtight container or large zip lock bag.  (yes, its worth your time to wrap these individually, it makes transporting them as snacks easy and also keeps them very fresh).


Friday, June 7, 2013

Soft Pretzels

Suck it Auntie Anne's!  I'm sick of paying $3 for a pretzel.  Seriously, when did something so simple become so expensive???  My child asks for a soft pretzel every time we go to the mall or Target or Sam's Club.  She sees the signs for them and "needs" one.  If I bought one soft pretzel every-other week that's over $75 worth of pretzels for the year!!!! And embarrassingly enough there's weeks when I buy 2-3 of these suckers.  Our soft pretzel craving can just wait until we get home from now on because with this recipe I'm all set!  This will be a great recipe to use during football season too ... what a great snack to serve during a game.  The pretzels turn out picture perfect and taste delicious.  I brushed mine with melted butter when they came out of the oven.  I'm sure you could leave off the salt and use sugar & cinnamon to make them a sweet treat.  Enjoy!!!


INGREDIENTS:
2 teaspoons active dry yeast
1/2 teaspoon white sugar
1/2 cup and 2 tablespoons warm water
(110 degrees F/45 degrees C)
2-1/2 cups all-purpose flour
1/4 cup white sugar
3/4 teaspoon salt
1-1/2 teaspoons vegetable oil
1/4 cup baking soda
2 cups hot water
2 tablespoons kosher salt, for topping
DIRECTIONS:
1.In a small bowl, dissolve yeast and 1/2 teaspoon sugar in warm water. Let stand until creamy, about 10 minutes.
2.In a large bowl, mix together flour, 1/4 cup sugar, and salt. Make a well in the center; add the oil and yeast mixture. Mix and form into a dough. If the mixture is dry, add one  tablespoon of water. Knead the dough until smooth, about 7 to 8 minutes. Lightly oil a large bowl, place the dough in the bowl and turn to coat with oil. Cover with plastic wrap and let rise in a warm place until doubled in size, about 1 hour.
3.Preheat oven to 450 degrees F. In a large bowl, dissolve baking soda in hot water.
4.When risen, turn dough out onto a lightly floured surface and divide into 6 equal pieces. Roll each piece into a rope and twist into a pretzel shape. Once all of the dough is all shaped, dip each pretzel into the baking soda solution and place on a parchment paper lined baking sheet. Sprinkle with kosher salt.
5.Bake in preheated oven for 8 minutes, until browned.

Sunday, June 2, 2013

Chocolate Cookie Truffles


"Well, there are lots of great treats this time of year - Zucchini Bread, Fruitcake.. but the thing that I most like to bring out this time of year are my Balls." -Pete Schweddy


Remember that gem from SNL?? ...When Alec Baldwin played Pete Schweddy with his Schweddy balls?!  Loved that skit!

Speaking of balls, this is a great dessert to bring along to a party or to serve at a party you may be hosting. It's the type of dessert that everyone will eat...small, sweet, chocolaty. I know you can find lots of recipes for these online, lots of different variations, ways to decorate, etc, etc.  I thought I would post this on my blog since I just made a batch of these yesterday to take to a bridal shower.  


When I'm at a party I have a difficult time deciding what to eat and what not to eat and I end up with a plate full of a little bit of EVERYTHING not often saving room for dessert.  I think that's why a small, bite-sized dessert is simply PERFECT for parties because I'm guessing I'm not the only one who tries all the different foods.  And let's face it, no matter how much you just ate you can certainly find room for a delicious chocolate truffle!


1 Package Oreo Cookies (generic brands work fine)

1 package cream cheese (8 oz), softened
1 package semi-sweet chocolate chips
1/2 cup white chocolate chips
50 mini cupcake papers 
this recipe makes about 50 truffles depending on how big you make your balls (giggle, giggle)

Line a cookie sheet with wax paper. Put all of the cookies in a food processor or blender and chop into fine pieces.
This is what the cookies will look like after being chopped.

Mix chopped cookies with the cream cheese until smooth.  Form small balls (about 1 tsp each) and place on a cookie sheet lined with wax paper.


Place in the freezer for 30 minutes.  Melt semi-sweet chocolate chips in a double boiler.  Dip cookie balls in melted chocolate to coat and place in mini cupcake papers.  Refrigerate 30 minutes.


Melt white chocolate chips in a small bowl in the microwave at 50% power for 20 seconds.  Stir chips.  If they are not completely melted, microwave again at 50% power for 10 seconds.  Place melted white chocolate in a small zip lock bag and snip the corner of the bag with scissors.  Drizzle white  chocolate over the truffles.  If you don't feel like messing with the white chocolate you could leave the truffles plain or top them with some extra crushed cookies.  Keep refrigerated until ready to serve.  Enjoy!


"Well, there's no beating my Balls. They're made from a secret Schweddy Family recipe. No one can resist my Schweddy Balls." -Pete Schweddy


Sunday, May 26, 2013

Caribbean Shrimp & Rice

While most people are probably enjoying some traditional Memorial Day weekend BBQ food like cheeseburgers and hot dogs, I'm standing in my kitchen looking at a pound of raw shrimp with no game plan.  My first thought whenever I see shrimp is scampi...a buttery garlic heaven, one of my all-time favorite dishes served over pasta. Today is different though, the weather is nice and something is telling me to make a dish out of the ordinary...an entree my husband won't expect because I know for sure while he sits on the patio he's thinking I'm inside the kitchen making none other than my classic shrimp scampi. Well surprise, surprise!  I am not a one trick pony when it comes to shrimp!  I see a can of pineapple chunks in the pantry and I think Caribbean shrimp.  Minus the turquoise water and white sand beach it turned out very close to island cuisine with a little kick from the red pepper flakes and sweetness from the pineapple it was a success. here's my recipe:

1 lb raw shrimp, peeled
1 can pineapple chunks (8 oz)
1 red pepper, chopped
1/4 cup chopped onion
2 tsp olive oil
8-10 cherry tomatoes, quartered
1 garlic clove, pressed
1/2 lime
1 cup brown rice
1 cup frozen peas
2 tsp Caribbean jerk seasoning
1/2 tsp red pepper flakes
salt & pepper to taste

Cook rice according to package directions. Meanwhile, in a large skillet saute the garlic, onions and red pepper in olive oil until softened.  Add pineapple chunks (reserve juice).  Brown the pineapple.  Add the shrimp and sprinkle with Caribbean seasoning, red pepper flakes and salt & pepper, squeeze lime juice over the shrimp.  Cook shrimp for about 4 minutes on each side until they turn orange in color. Steam the peas in the microwave for 2 minutes, drain water.  Add rice, pineapple juice, peas and tomatoes.  Serve & enjoy!

makes 2 servings

I don't know if there's anyone out there reading this blog but I wanted to update this and let you know I made this recipe again tonight (7/8/2013) and I added a can of black beans...it was a great addition!!

Salted Caramel Corn (Homemade Cracker Jack)


I have been eating handfuls of this since I made it....its extremely addicting! It satisfies both a sweet and salt craving while at the same time bringing your mind back to childhood memories of looking for a prize within the Cracker Jack box.  I am not responsible if you eat all of this in one day!


INGREDIENTS:
12 cups plain popped popcorn
2 cup pretzels
1 cup salted peanuts or pecans
1 cup light brown sugar
1/4 cup light corn syrup

1 - 2 teaspoons coarse salt (I prefer 2)
1/2 cup butter or margarine
1 teaspoon vanilla

1/2 teaspoon baking soda


DIRECTIONS:
preheat oven to 300' F.

Toss together the popcorn, pretzels and peanuts in a 9 x 13 pan
In a medium saucepan, combine the sugar, salt, corn syrup and butter; bring to a boil over medium-high heat. Reduce heat to medium-low and continue cooking without stirring for 5 minutes.

Remove from heat and carefully stir in vanilla and baking soda.
Pour the salted caramel mixture over the popcorn, pretzel and peanut mixture and quickly stir together until all of the popcorn, pretzels and peanuts are coated with the caramel mixture.
Bake for 30 minutes stirring the mixture half way through the baking time.  Pour mix onto a large sheet of parchment paper to cool.  Pull apart into pieces and enjoy!